Saturday, 7 July 2012

Boudoir Lashes - 50% off for my readers!

As you may have noticed from this blog and my YouTube videos I am a fan of big lashes. I don’t need much of an excuse to stick on a pair of falsies or pile on the mascara! However, having used various eyelash growth stimulators such as Lilash and Rapidlash I definitely prefer the natural look. I was therefore really excited to be given the opportunity to try out a full set of lash extensions from Boudoir Lashes!

Boudoir Lashes is based in the prestigious Becca store, just minutes from South Kensington. Luckily, this is very close to my house so I was able to rush there makeup free post shower as Asma advised me that I should not get my lashes wet 24 hours after application. Having had cluster extensions before I was looking forward to seeing how different the individual lashes would be.

Asma welcomed me in and was absolutely lovely. We got started straight away after a consultation and cleansing the area to make sure there were no impurities on the lashes. She first applied little protector pads under my eyes and stuck my bottom lashes down with tape. I am very squeamish when it comes to my super sensitive eyes, but I can assure you this only took seconds and was completely harmless.
 My little lashes before treatment

As I lay with eyes closed Asma began to carefully apply the lashes. She was extremely gentle so there was no tugging or pulling on the eyes and were it not for the sounds of people coming in and out of the store I would have fallen asleep! (Normally Asma is located downstairs where it is much quieter, but we were upstairs due to a bridal event that weekend).

Just under an hour later my lashes were finished and though I was excited to see them I knew this was the part I had been dreading as the last time I had my lashes done the glue made my eyes so irritated that they were red and streaming almost an hour after application. Well, I need not have worried! As I opened my eyes and the pads and tape were removed there was absolutely no stinging or irritation. I blinked a few times and though I could feel my lashes were heavier they still felt light, fluttery and most of all natural.
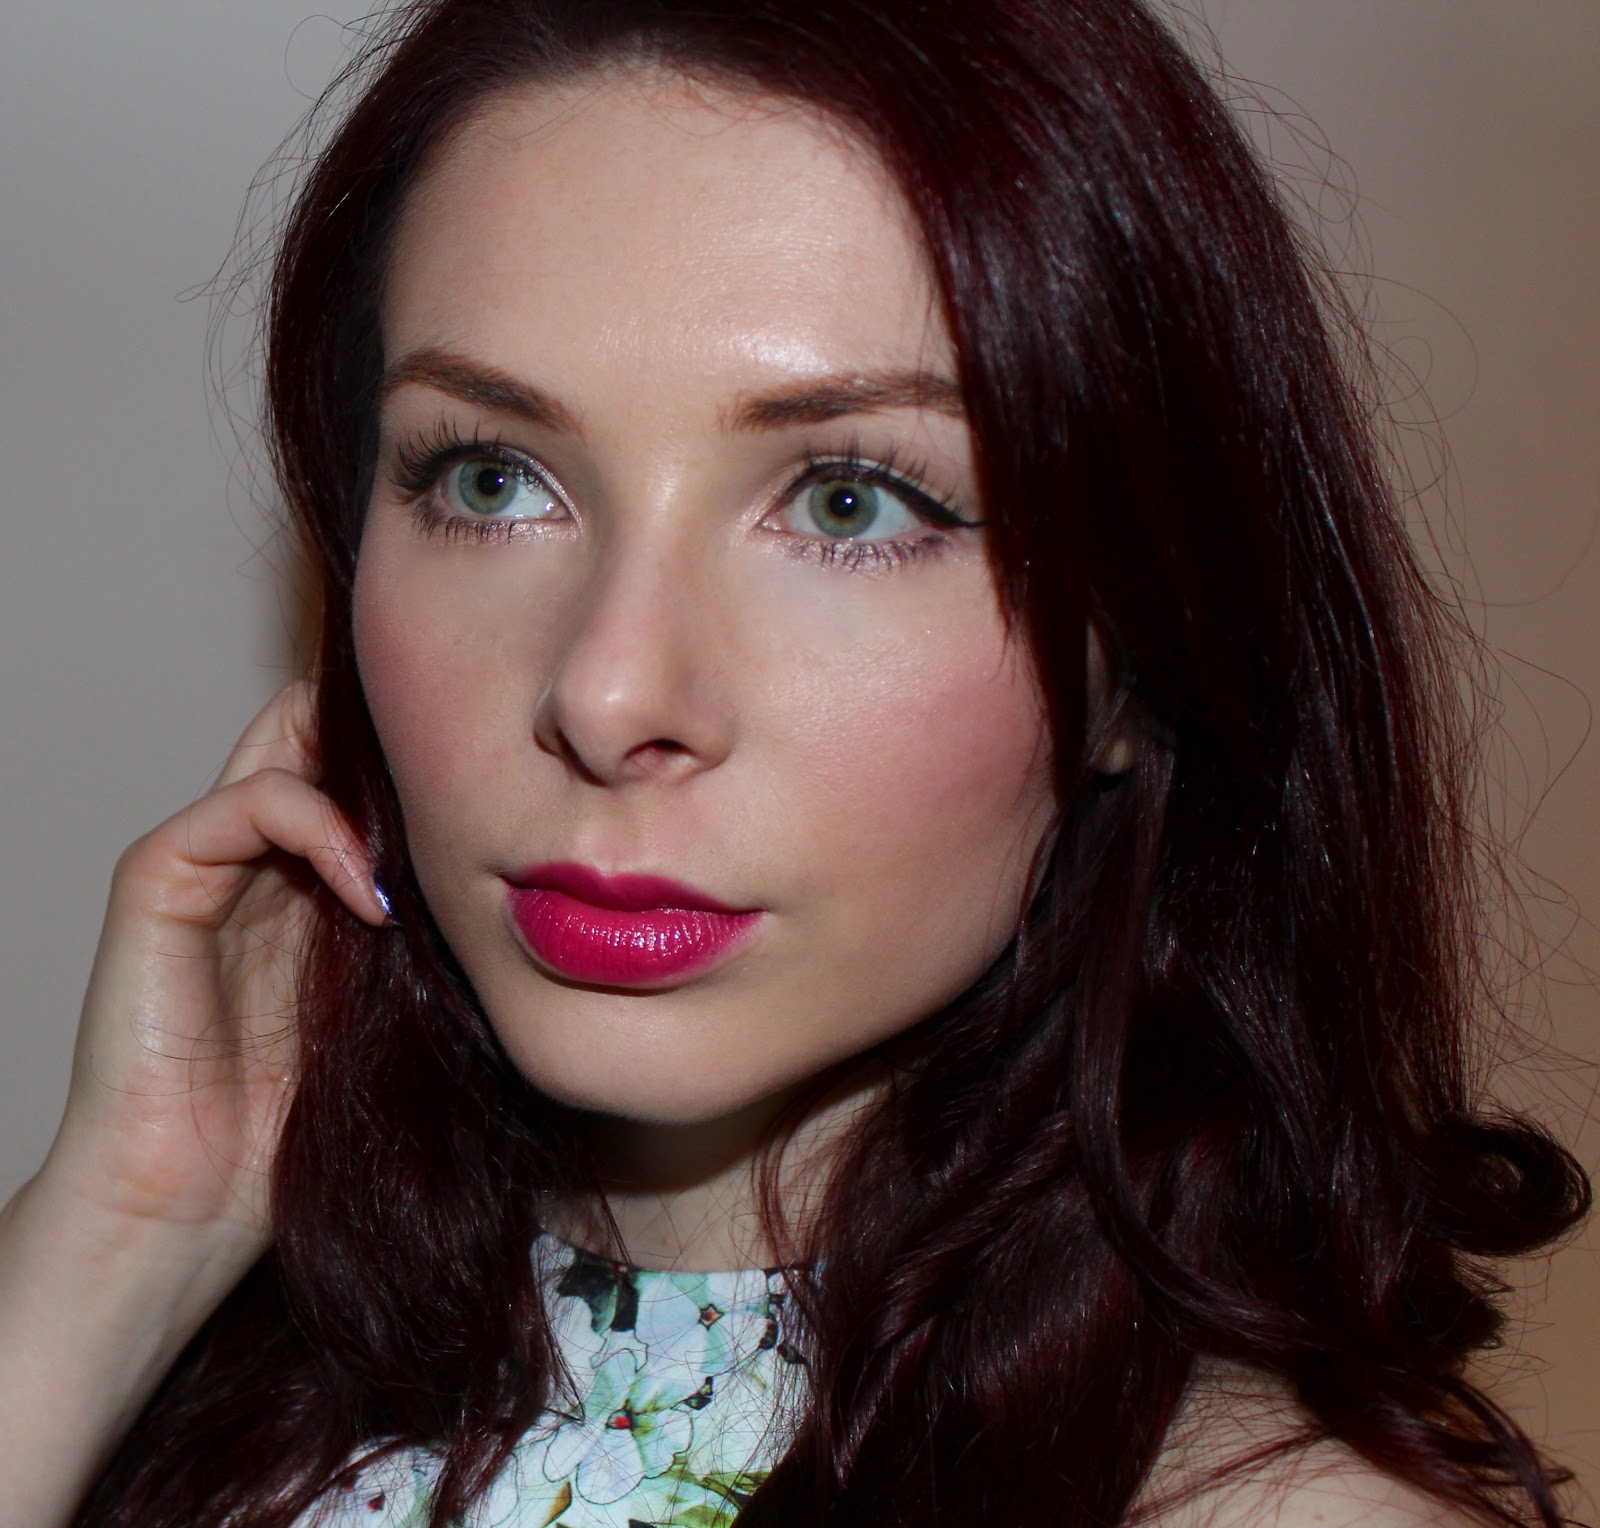
Looking into the mirror I was so happy with the results. My lashes were long, looked darker and more voluminous, but the shape created was the same as my own lashes so they looked extremely natural. They blended in so well that it was almost impossible to tell they were not all my own.
I don’t know what it is about lashes, but I could rest easy if my hair, skin and lashes always looked good!
After my appointment I made sure to keep the lashes dry, forego my usual oil based cleansers, skip the mascara and try to sleep on my back. I am a horrendously antisocial sleeper – usually sprawling like a starfish on my front, but I made a mental note to try and at least sleep on my side to ensure I didn’t squash the lashes in my sleep and wake up with kinks. As the lashes are light and flexible the few times that I did find myself nose first in my pillow in the morning I simply combed them through with a clean mascara wand and they bounced back into shape.

As my lashes defined my eyes I felt I needed much less eye makeup. For the next week or two I mainly stuck to a little bit of liquid liner, which I gently removed at the end of the day with a damp cotton bud, making sure not to pull on any of the lashes.
(day after application)

Asma says that the lashes last about 3 weeks and I would say that they stay full, with only the odd one jumping ship for about 2/3 weeks. After 3 weeks I did start losing more lashes and began to use a little mascara on the roots to hide any gaps. No doubt this hastened the shedding process, but they actually stayed put for much longer than anticipated and almost 6 weeks since my appointment I still have 2 stragglers lol! Of course after a few weeks you can get your lashes filled in or come in to have them professionally removed, but I found that they fell out on their own well enough with no unsightly patches. My real lashes are now a little shorter and less healthy than they were prior to application, but I would not say the difference is dramatic, nor is it something that can’t be changed with a little conditioning treatment. Since the lash cycle is roughly 3 months though they seem shorter they are still growing until they reach full term.
(2 weeks after application)
 
Overall I was so happy with my lashes and would love to have them done again. They are absolutely perfect for a special occasion, holiday or just a little treat for yourself and I am so excited to let you all know that Asma has been kind enough to offer a discount for my readers! 50% off a full set of lashes for the first 25 readers to book - please contact asma on info@boudoirlashes.co.uk with FGM50 as your redemption code (subject to availabilty terms and conditions apply ask at the time of booking).

Please do let me know if you decide to try these out as I would love to hear about your experiences! xxx
SHARE:

Sunday, 1 July 2012

Prohibition in the 1920s

Last weekend I stepped back in time to the roaring 20s at one of Prohibition's secret parties. Though the dates of these are not top secret the venues are hidden and only disclosed to ticket holders. If you haven't heard of this before, then do check their website out here. With flowing vintage cocktails served in tea cups, live bands, silent movies, casino and even a burlesque show this was definitely a fun and unusual way to spend a Saturday evening. It was fabulous!
You all know that I love to dress up and when given a theme I can never go less than all the way! Luckily, I already had this little flapper outfit hidden away in my wardrobe. The dress is a Massimo Dutti number that I have had since I was 16 (does that count as vintage?). My style has changed so much since then and I even surprised myself that I have kept it all these years. The dropped waist style is perhaps the least flattering shape of all for my figure as it highlights the widest part of the hourglass and the length shortens my legs. To accesorize I wore my Chanel pearls and various feather pieces including a broach that I made into a headpiece, a feather clutch from ASOS and green feather detailed shoes from New Look.
Even the bf grew a 2 day moustache for the occasion so I made sure we both looked perfectly 20s. I tonged my hair with the Babyliss Wave Envy (check out my review here) to add texture. I then painstakingly pinned it around the nape and folded it under my shorter layers to create a faux bob, which I am proud to say lasted through many a dip on the dance floor! 
For makeup I used lots of powder to create flawless, matte and pale skin. I then contoured the cheeks to narrow my face shape. On the eyes I used a mixture of pigments - collection 2000 teal all over,  shimmery golden green in the centre of the eyelid, matte brown to blend and create a more rounded eye shape. I also made my brows thinner and darker to create the classic strong, slimline pencil brow of the 1920s. I then added two pairs of lashes (top and bottom) to make my eyes look larger and alter their shape. I used the new Katy Perry Cool Kitty lashes (£5.95 here) on the top as they are perfectly full and not too long.
I then finished off with a strong lip, making sure to define the cupids bow. This is my slightly more modern and wearable take on flapper makeup!
Have you ever been to a 1920s themed party? What is your favourite decade? Are you tempted to attend the next Prohibition event? I believe it will be held on Saturday the 8th of September! xxx
SHARE:

Sunday, 20 May 2012

FOTD: 10 Mins Going Out Makeup

When in a rush I usually go for fail safe combo of bright lips and neutral eyes. This whole look took about 10 minutes, which I think is pretty speedy... though I have no doubt the bf would disagree ;).
With my amazing new Boudoir lashes (review coming soon) all I had to do was add a flick of L'Oreal carbon gloss eyeliner and a tiny amount of MAC's Phloof in the inner corners to open up my eyes.
I then used a small amount of MUA's Hot Lips lip balm on my cheeks (multi tasking) and mixed a red Eyeko lipstick with MAC's cool toned gladiola to create a statement. I find that mixing colours and layering up different textures of lip products ensures that your colour stays put all night!

What are you fail safe makeup choices? What products do you rely on to get ready in a hurry? xxx
SHARE:

Friday, 6 April 2012

Sketchy Melon Tutorial

This tutorial came about while I was playing around with a few different eyeshadow colours. I decided to mix a shimmering peachy melon with a deeper, matte blackberry accent. What do you guys think of this combination?


Products used:
Avon Ideal Flawless Foundation (Light Pink)*
17 Blush First Kiss*
MAC MSF Pink Porcelain
Avon P401 lipstick*

UDPP
MAC Paint Pot Fresco Rose
MAC Melon Pigment
MAC e/s shale, sketch, shroom
Max Factor Liquid Effect Eye Liner Black*
L'Oreal Carbon Gloss Liquid Liner
Black shadow from UD Naked
Eyeko Skinny Brush Mascara*
Lashaholic lashes LA03*
This is not a sponsored video. Products marked with * were given to me at events or sent for review consideration.
If you would like to see more of my makeup tutorials please subscribe to my YouTube channel here. Thank you for watching my lovelies! xxx
SHARE:

Wednesday, 29 February 2012

Beauty Marked Sketch

On Saturday one of my work girlies was celebrating her birthday in Soho so I popped in for a few cocktails. As I had been on the go all day I decided to quickly amp up my makeup for a fun night out.
As I was in a bit of a rush I didn't have a chance to write down everything I used (bad beauty blogger!), but I was mainly playing with a few products from my collection to create a deep, sultry plum smokey eye and a nude nip.

Skin:
  • NARS Sheer Glow foundation (looks great in photos) mixed with Dior Forever (lasts well).
  • Bobbi Brown creamy concealer.
  • ELF glow powder (it's not very shimmery, so works great as a setting powder when you want your skin to look radiant).
  •  YSL Afrique bronzer
  • NARS Angelika Blush
Eyes:
  • MAC Macriviolet fluidline (as base)
  • MAC Beauty Marked e/s (on lid)
  • MAC Sketch e/s (in crease and lower lashline)
  • Blackberry pigment sample (on centre of lid for a little shimmer)
  • MAC Shroom and Vanilla e/s (as highlight on brow bone)
  • L'Oreal Carbon Gloss liquid liner
  • Eyeko Skinny Brush Mascara (£15 here)
  • Lashaholic LA03 Wispy Strip Lashes (£7.95 here)
 Lips:
  • MAC Creme d'nude
  • Clarins Instant Light lipgloss 02 Apricot Shimmer (£10.80 here)
I love the look of a red based purple as I think it makes all eye colours brighter and more vibrant!
What do you guys think of purple eye shadow? It can be a tricky one to work with, but it is one of my absolute favourite colours! What are your favourite eyeshadow colours? xxx
SHARE:

Wednesday, 23 February 2011

Browhaus Lashes in Bloom

Lashes! 


As a girl who hasn't been blessed with naturally long, flirty lashes I have always been obsessed with them. False lashes, growth serums, old wives tales of Vaseline, I have tried my fair share! So when I was invited to try Browhaus' new Express Lash in Bloom I decided it was time for me to delve in to the world of eyelash extensions.

So on a Friday night I made my way to Floral Street in Covent Garden to get my lashes pumped up to their fullest. I was given a form to fill out with the usual checks and swiftly lead downstairs for my treatment. Lying back in the cosy chair my therapist Ellie explained the procedure in detail and answered all my questions showing great knowledge (and patience as I was curious about every step).

First she applied tape to my lower lashes to prevent them from sticking to my upper lashes. Although this did feel a little strange at first it wasn't all that uncomfortable and I soon got used to it. As I closed my eyes Ellie applied the dark glue to my lashes and began carefully adding in the clusters one by one. The whole procedure was very comfortable, there was absolutely no poking or pulling, and towards the end of the 40mins I let the soft music relax me and actually fell asleep!

As the glue dried Ellie gently fanned my lashes to speed up drying time. I then slowly started to open my eyes. Now, I have to warn you that my eyes are extremely sensitive. I have a million allergies and my eyes get irritated by the most benign of substances on a daily basis. As I opened my eyes the fumes from the glue did make them water (a lot!) and when I looked in the mirror I could see that they looked sore. The redness and irritation lasted for about half an hour, but as the glue used is an extra strong formulation that insures the lashes stay in tact for three to six weeks, this was to be expected. It was not painful at any point, just annoying as my eyes were watering. Seeing the results was definitely worth it though!
The pictures below were taken as soon as I got home. I am not wearing any eye makeup - no eyeliner, and definitely no mascara, so you can see just how amazing these lashes look!

I was given a booklet of instructions and after care tips to take with me and Ellie made me promise not to tug on my lashes as my natural ones would fall out with them (I would never, ever do that anyway lol)! I was also told that I should be very careful in cleaning them - avoiding any products that contain oils, which would start to dissolve the glue. I also had to be careful not to let them get too hot eg. in a hot shower or bath, and not to flatten them eg. by letting shower water beat down on them.

This all sounded fine until I tried to wash my face that night. I never realised before just how often I rub my eyes! As I normally use my cleanser all over I had to be very careful to keep it away from my eyes when washing my face. I also had to use an oil free makeup remover on a q-tip and sweep it very lightly across my lash line. Though the lashes are a great time saver in the morning, as I no longer have to apply mascara and can quite comfortably skip the eyeliner, at night my cleansing routine is a little more complicated and time consuming.

In the same way in the shower I try to keep my face as dry as possible. So when I (inevitably) get shampoo in my eyes it's very uncomfortable as I can't rub my eyes or rinse them under the shower. Of course this would be the same with any eyelash extensions. In fact I think the whole process has been quite (excuse the pun) 'eye opening' and I am now learning not to touch my eyes so much, and be more delicate when I do, which can only be a good thing!


This is what the lashes look like a week after application. As I write this review a week and a half later I am still sitting here with every cluster perfectly in tact.. yay! I shall update you all further on their longevity when I have them taken out (or need to have infills, I haven't decided yet).
As you can see with just a flick of eyeliner my eyes look complete. I have definitely started wearing less makeup on a day-to-day basis as the lashes look so beautiful on their own, I feel that my eyes don't need a lot of extra definition.

Browhaus are currently having a promotion where their Express Lash In Bloom is just £30 for first time customers! You can find more information about the treatment and how to book here.

Have you ever had lash extensions? What has been your experience? Are you curious about trying them? xxx
SHARE:

Wednesday, 30 September 2009

FOTD- Saturday and Maxie being a little thief :).

This weekend was a relaxing one with the boyfriend- plenty of good food (Sainsbury's are doing a recession friendly offer for a two course taste the difference meal and a bottle of wine for two for only £10!), DVDs, and X-Factor. However, on Saturday night we managed to dislodge ourselves from the couch for some drinks and a few giggles at a comedy club.
 (Luke always boasts that he has longer eyelashes than me, but I think I win with a little help ;). Who do you think wins, nature or Revlon? Hehe).

Never missing a chance to play with my makeup, but only having a few minutes to get ready I decided to keep it simple, but add drama with lashes.
Eyes- MAC naked pigment over my lid, with burnt burgundy in the crease (love this for green eyes).
MAC blacktrack fluidline
Maybelline pulse perfection mascara
REVLON Intensifying lashes 99500- add subtle length
Lips- MAC subculture lipliner
Bodyshop Colourglide lipstick in Dusk Pink (No. 42- smells so yummy)
You may be wondering why I would fuss with lashes if I am trying to be speedy, but I will let you in on a little secret, they took less than 30 seconds to put on! These lashes come with adhesive already on them, so there is no mess, no sticky fingers and no time spent dancing around the room, waving them about to get the glue tacky. I just peeled them off, stuck them on, and surprisingly they stayed put all night! Success!!


The downside of these is the adhesive band. For my liking it is too thick, though this makes it easier to adhere and adjust. It is also shiny, so it can look obvious, and I much prefer a clear band. This to me seems strange as these lashes are made to look very natural (especially compared to some of the monstrosities I have previously worn on photo shoots etc.), yet the band would not blend in to the lashline without fairly thick eyeliner.


However, I would definitely recommend these for beginners, as they are much less fiddly and you won't be getting glue all over your eye makeup. Kindly, they come with a little lash applicator, which you can use to make them more secure, or manouevre them down so that there are no obvious gaps between the band and your lashes. There is also an extra adhesive strip so they can be re-used, and after that you can of course use them with your own glue :).

If you are on old hand at false eyelashes, these may not be for you, but I really like them and will be stocking up on a few pairs for those clumsy days when DUO just doesn't co-operate, or if I am in a rush.

Unfortunately, I can't re-use mine, as the second I took them off Maxie mistook them for a spider and decided to chew them to death! I really wish I had a camera to capture the moment he proudly sauntered up to me with an eyelash casually hanging out of the corner of his mouth. With all the stollen brushes, Q-tips and lipsticks I think Maxie is becoming a modern man and has started to build his own make-up collection ;).

Natalya
xxx
SHARE:

Friday, 15 May 2009

Lilash Review.


I have always had short, thin, stubborn lashes which I tried to plump up as much as possible with mascara, or else just give up and go for falsies. I was incredibly jealous of people with long, full eyelashes and wondered why nature had not blessed me with these. After all, my mother has lovely long lashes and even my boyfriend has camel-like eyelashes, though I'm sure boys don't really need them! Highly unfair!!

In a vain attempt to remedy this problem I purchased lilash from ebay in the beginning of February. At first I was skeptical, and after the first 4 weeks nothing changed and I thought that I had wasted my money yet again on a gimmick, but many of you encouraged me to continue so I carried on applying it twice a day along the top lashline. By 6 weeks I did start noticing a difference, and now at 10 weeks I have even had to trim a few of my eyelashes as they were touching my eyebrows and really getting in the way! Have I ever had this problem before? I think not!!

My eyelashes really have grown an incredible amount, but I would not say they have become much thicker or more in number, although I have noticed a reduced loss. Before lilash every night when I removed my makeup I would see a couple of casualties (and weep... not really!.. well, maybe a little), but now they seem much stronger and fewer lashes are fleeing each night :).

They have also become exceedingly curly, which would be great for people who have very straight lashes. However, for me, to be honest it is a bit irritating since it is very difficult to apply mascara as they curl back on themselves and make a mess. I would also caution those who wear glasses as I find the lashes make it somewhat uncomfortable.

Many of you have noticed the difference, even in my low quality videos, which I think is testimony enough! I now wear much less mascara and eyeliner and they still look long and full. I am extremely happy with the results! The evidence is clear in the photos.

Before lilash:
After Lilash:
I hope this review was helpful as many of you were enquiring about it.
Almost the weekend!
Natalya
xxx
SHARE:
© Natalya's Beauty Blog- Filthygorgeousmakeup. All rights reserved.
BLOGGER TEMPLATE DESIGNED BY pipdig